Sakshi Education
In Arduino programming part1 we learned that how to install the Arduino IDE for different operating systems and how to use Arduino IDE with examples. In this article we will learn some basic programming using Arduino.
Introduction to Programming:
A program is a sequence of instructions written to perform a specified task on a microprocessor/microcontroller. It is basically handling the inputs and producing the outputs according to the need. C programming is used everywhere and it provides a lot of advantages.
They are as follows:
Arduino C:
Arduino can be programmed with C and C++. C++ considered as advanced version of C language. It added some more new concepts and elements to C. Basically C++ defined as C with object oriented programming. Almost all Arduino libraries are made using C++ in order to be easily reusable.
The Arduino Libraries:
A library is a collection of resources that are available for the use programs. Libraries are very specific and can be global purpose. They can include different types of things, such as following:
Arduino native libraries:
The local library is intended for very basic and global purpose. It implies it may not be sufficient, but rather it likewise implies you will utilize it each time in all your firmware design.
It is partitioned in the following three sections:
The following steps are used to find the native library in Arduino IDE:
Figure 1: Native library
You can find some more other libraries in the following link
arduino.cc/en/Reference/Libraries
Bit operations:
Most of the embedded system programming we manipulate data in bits. For example to read data from sensor we need to set a single bit. For bit manipulations we need to know so’me operators. They are
Introduction to Programming:
A program is a sequence of instructions written to perform a specified task on a microprocessor/microcontroller. It is basically handling the inputs and producing the outputs according to the need. C programming is used everywhere and it provides a lot of advantages.
They are as follows:
- It is small and easy to learn.
- It is processor independent, which means compilers exist for almost all processors. This provides flexibility to the programmers that they can concentrate on algorithm and applications not on the hardware.
Arduino C:
Arduino can be programmed with C and C++. C++ considered as advanced version of C language. It added some more new concepts and elements to C. Basically C++ defined as C with object oriented programming. Almost all Arduino libraries are made using C++ in order to be easily reusable.
The Arduino Libraries:
A library is a collection of resources that are available for the use programs. Libraries are very specific and can be global purpose. They can include different types of things, such as following:
- Configure the data
- Type definitions
- Subroutines and reusable part of code
- Help and documentation resources
- Classes
Arduino native libraries:
The local library is intended for very basic and global purpose. It implies it may not be sufficient, but rather it likewise implies you will utilize it each time in all your firmware design.
It is partitioned in the following three sections:
- Variables
- Functions
- Structure
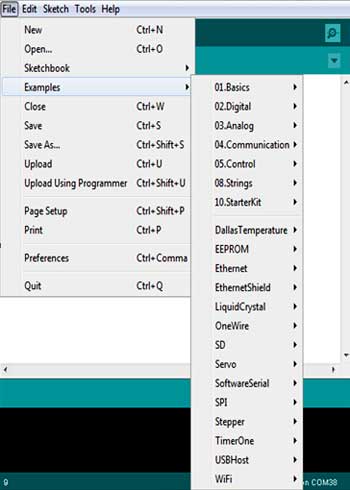
The following steps are used to find the native library in Arduino IDE:
- Open Arduino IDE
- Go to “File”
- Move to “Examples”, you will see the following screenshot Figure 1, which shows so many examples related to the native library only.
Figure 1: Native library
- Select 01.Basics and blink example: A new window is displayed as shown Figure 2.
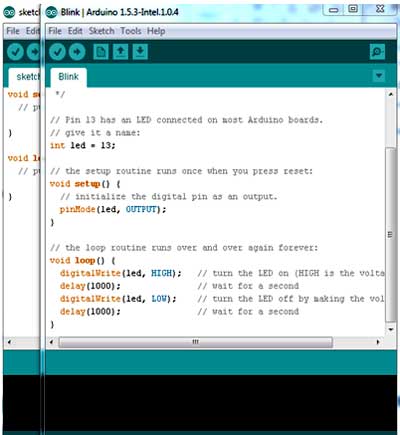
Figure2: Blink example
- Select any colored keyword and right clink on that you can find in the menu “Find in Reference” as shown in Figure 3.
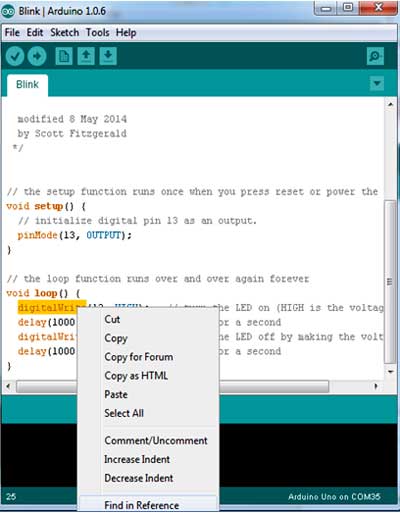
Figure3: Find the reference
- By clicking on the keyword, your Arduino IDE directly called a default browser with a html page corresponding to the help of the keyword on which you clicked as shown in the Figure 4. You can stay concentrated inside your IDE and get help from that.
Arduino Other Libraries:
The Arduino IDE has other libraries included but they are provided directly.
- EEPROM gives functions and classes to read/write in hardware storage components. It is exceptionally helpful to store something beyond the power state of Arduino that is when the power is off.
- Ethernet serves to make layer 2 and layer 3 communications over an Ethernet network
- Firmata is utilized for serial communication.
- SD gives a simple approach to read/write SD Cards, it is a more easy to understand.
- Servo helps to control servo motors.
You can find some more other libraries in the following link
arduino.cc/en/Reference/Libraries
Bit operations:
Most of the embedded system programming we manipulate data in bits. For example to read data from sensor we need to set a single bit. For bit manipulations we need to know so’me operators. They are
- “!” NOT operator.
- “&” AND operator.
- “|” OR operator.
- “^” XOR operator.
- NOT (!) operator:
Not operator simply inverse a bit, it turns a 0 into 1 and 1 into 0, as shown in the following table1.
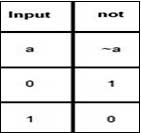
Table1. Not operation
Example:
a = 0011
!a = 1100
- AND (&) operator:
The bitwise AND operator (&) compares each bit of the first operand to the corresponding bit of the second operand. If both bits are 1, the corresponding result bit is set to 1. Otherwise, the corresponding result bit is set to 0.
Example:
a = 0011
b = 1011
a&b = 0011
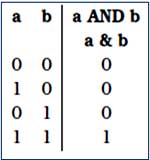
Table2: AND operation
- OR (|) operator:
The bitwise inclusive OR operator (|) compares each bit of its first operand to the corresponding bit of its second operand. If either bit is 1, the corresponding result bit is set to 1. Otherwise, the corresponding result bit is set to 0.
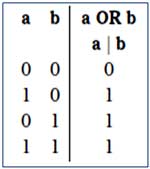
Table3: OR operation
Example:
a = 0011
b = 1011
a|b = 1011
- XOR (^) operator:
The bitwise exclusive OR operator (^) compares each bit of its first operand to the corresponding bit of its second operand. If one bit is 0 and the other bit is 1, the corresponding result bit is set to 1. Otherwise, the corresponding result bit is set to 0.
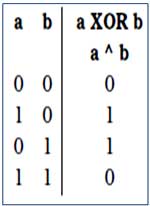
Table4: XOR operation
Example:
a = 0011
b = 1011
a^b = 1000
Published date : 14 May 2015 03:34PM